What is AI Coding?
AI Coding is an AI Assist feature designed to facilitate your coding process while giving you complete control over the analytical work. With AI Coding, you can use AI Assist to analyze a single document and receive text segment coding suggestions based on your specific coding criteria. This automated coding approach ensures AI adheres to your analytical perspective.

AI Coding in MAXQDA offers more than just a way to automate a document's initial coding—it can also serve as a powerful tool for enhancing and refining your manual coding process.
Whether coding a document from scratch or reviewing a fully coded project, AI Assist can act as a second set of eyes, helping you cross-check your work, identify any segments you might have missed, and even highlight differences in interpretation.
A brief overview of the AI Coding workflow
First, users choose the document and the code they want to apply. Then, they provide a clear code definition, including coding inclusion and, if appropriate, exclusion criteria. Then, AI Assist analyzes the document, applies the code to relevant text segments, and ƒexplains the coding rationale. Finally, users can review and finalize the AI-suggested segments.
AI Coding works for one document and one code at a time, meaning that every AI Assist coding request can code a single document with a single code. This also means you can only run one AI Coding process at any given moment.
How to code with AI Assist
Initial setup and preparation
To get started with AI Coding, you will need to have already created at least one code in the "Code System" window.
If you are working with a PDF document with headers and footers, we suggest removing them from the analysis before applying AI Coding. This will help ensure more accurate coding suggestions. You can find guidance on how to exclude them in our "Exclude areas from PDF documents" section at the bottom of the manual's chapter on PDFs.
Start AI Coding
Once you have a code, you can initiate the process by navigating to:
- The AI Assist main menu
- Open a document (text or PDF) and ensure you are viewing it in the "Document Browser" window.
- Navigate to the AI Assist tab and from its menu select AI Coding.
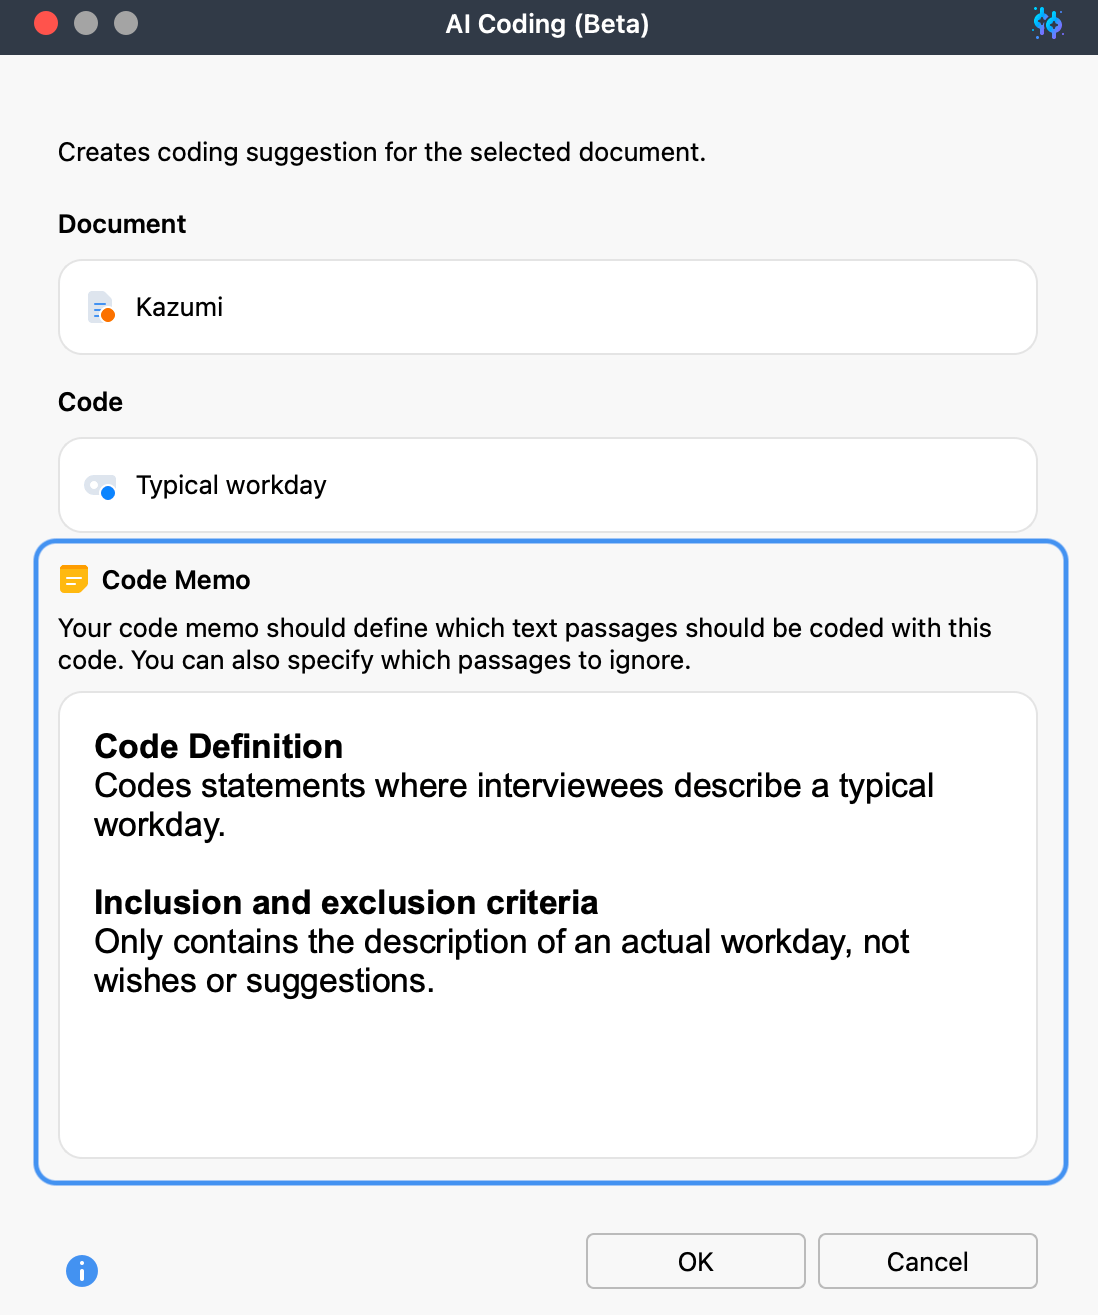
- A dialog box will open. Drag and drop your desired document and code into the respective fields.

- The "Document Browser" toolbar
- Open a document (text or PDF) and ensure you are viewing it in the "Document Browser" window.
- Click the
 AI Assist icon in the toolbar.
 - Select AI Coding from the dropdown menu for the AI Coding dialog to appear.
- Drag and drop a code from the "Code System" into the respective field in the AI Coding dialog.
- The code's context menu:
- Right-click on the code in the "Code System" window.
- Select AI Assist > AI Coding for the AI Coding dialog to appear.
- Drag and drop a document (text or PDF) from the "Document System" into the respective field in the AI Coding dialog.
- A document's context menu:
- Right-click on a document (text or PDF) in the "Document System" window.
- Select AI Assist > AI Coding for the AI Coding dialog to appear
- Drag and drop a code from the "Code System" into the respective field in the AI Coding dialog
Provide a clear code definition in the code memo
You can also find a code memo field in the AI Coding dialog (once you add a code). Code memos are crucial to outline a code's intent, define it, and explain when it should be applied.
This is particularly important in AI Coding with MAXQDA since the code memo guides AI Assist in understanding your coding intent. Without a detailed memo, AI Assist may misinterpret your intent, leading to less optimal results. A well-defined code memo is key to improving AI's accuracy in identifying relevant segments.

If you have already created a memo, it will be displayed in the AI Coding dialog, and you can modify it if needed. Alternatively, you can create a new one on the spot. Any changes you make to the code memo in this dialog will be reflected in the selected code's memo.
How to get the most out of your code memo
A typical structure of a code memo may look like this:
- Code definition:
Provide a clear and detailed description of what the code represents. - Inclusion criteria:
Define the scope of text that should be coded with this particularl code - Exclusion criteria (optional):
Include information about what should be excluded from coding. Using exclusion criteria can improve AI Coding results by reducing ambiguity. - Examples (optional):
Offer hypothetical or actual examples of text segments that illustrate when to include or exclude the code. This may help AI Assist better understand your intentions and context. However, keep in mind that providing examples may also narrow the coding process's scope, potentially reducing the number of identified segments.
Process document with selected code
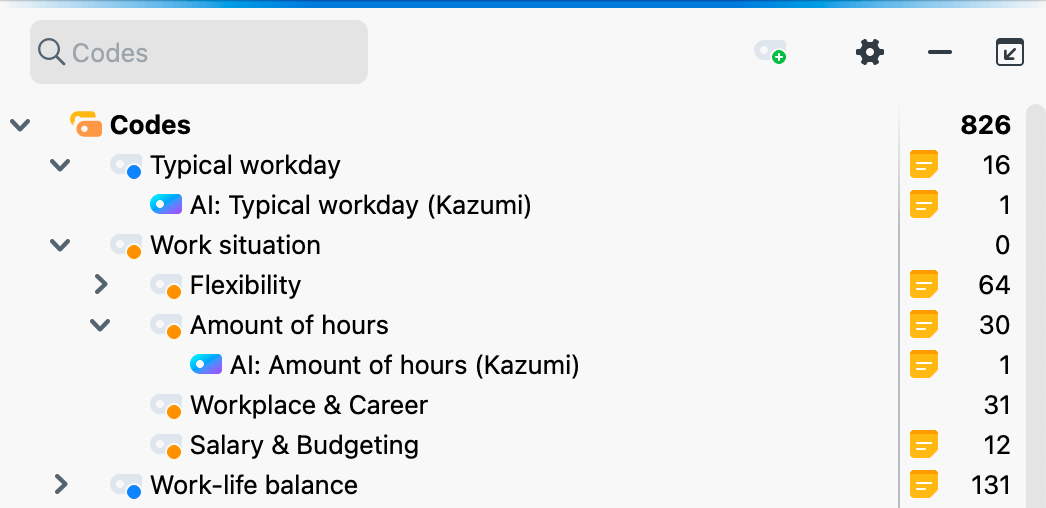
After you click OK, AI Assist analyzes your document, identifies relevant segments based on the code definition, and generates a new subcode that nests under the original code.

AI-generated subcodes are distinguishable by their unique colors and naming conventions, making it easy to differentiate them from manually applied ones.
Once completed, MAXQDA will automatically navigate to the first coded segment in your document, and you can start reviewing the coding suggestions.
If AI Coding does not identify any segments, MAXQDA will notify you. In this case, you have the following options:
- Restart the process with an updated code memo.
- If you are confident that matching segments exist in the document, you can retry the process using the same code memo. AI Assist may produce slightly different results on subsequent runs and potentially identify additional segments.
However, keep in mind: AI Coding is not flawless. It is essential to carefully and critically review the results and manually refine them as needed.
Review AI-generated coding suggestions
Once AI Assist has completed coding your document, it is time to carefully review the AI-generated segments to ensure they align with your analytical framework.
Here are typical actions for reviewing and refining AI Assist’s suggestions:
- Consider the AI-added comment.
As you review each segment, you can consider the rationale provided by AI Assist in the code comments, explaining why a segment has been autocoded. If you do not want to keep a segment, you can delete it by right-clicking on its coding stripe in “Document Browser” and selecting Delete from the context menu. - Adjust segment boundaries.
The granularity or scope of the suggested segments may differ slightly from your coding approach. In such cases, you can manually refine the boundaries of the coded segments: Select a coded segment by clicking on its coding stripe and adjust its boundaries by dragging the code grabbers.

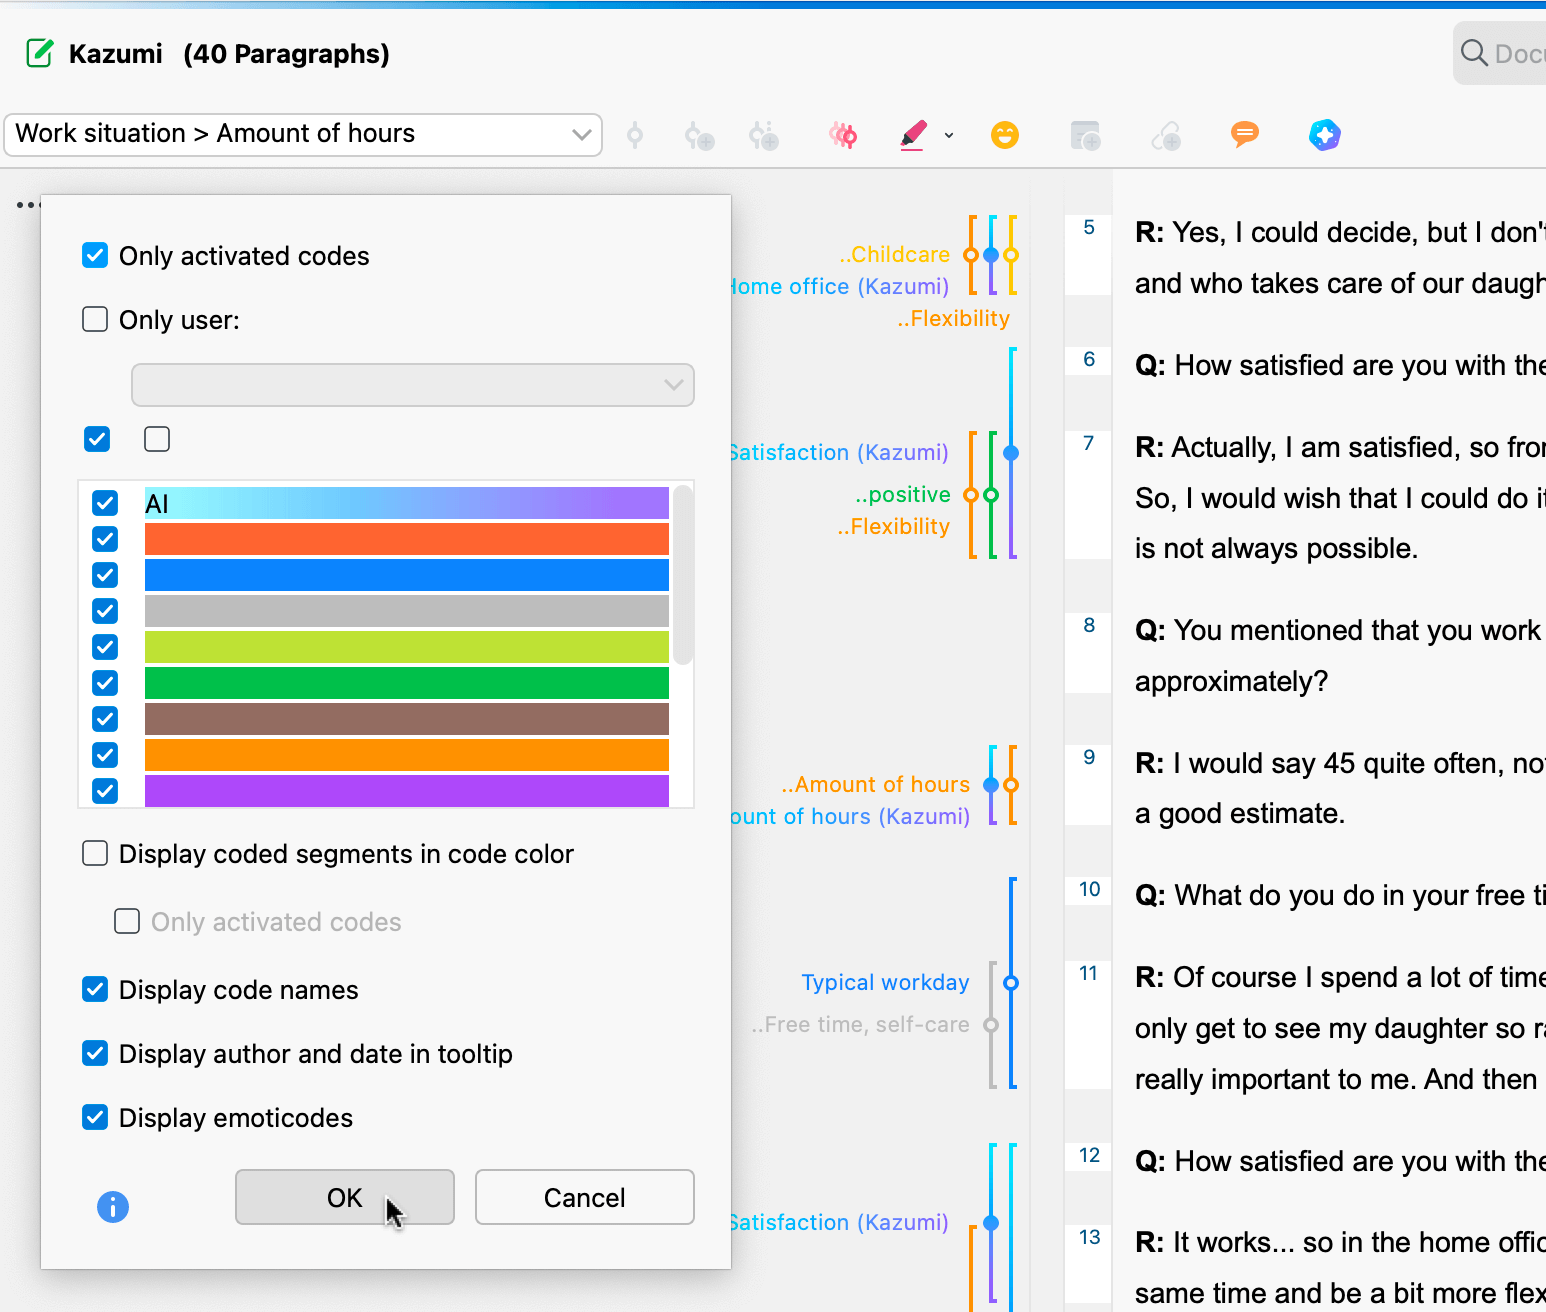
- Filter displayed codes and coding stripes.
When working with multiple codes, the coding stripe column in the "Document Browser" can become cluttered. To declutter the view and focus on specific codes, you can filter which ones to display at once. To declutter your view, activate the codes you want to work with and select Show only activated codes in the coding stripe visualization options.

Integrating AI-generated codes into your code system
After reviewing and refining the AI-suggested segments, the next step involves integrating the AI-generated subcodes and their respective coded segments into your coding scheme. To do this, you can use one or more of the following methods:
Move AI-coded segments to the parent code
You can move AI-coded segments directly into the parent code (i.e., the manually created code). This can be done by moving all coded segments at once or one segment at a time.
All segments at once via segment moving
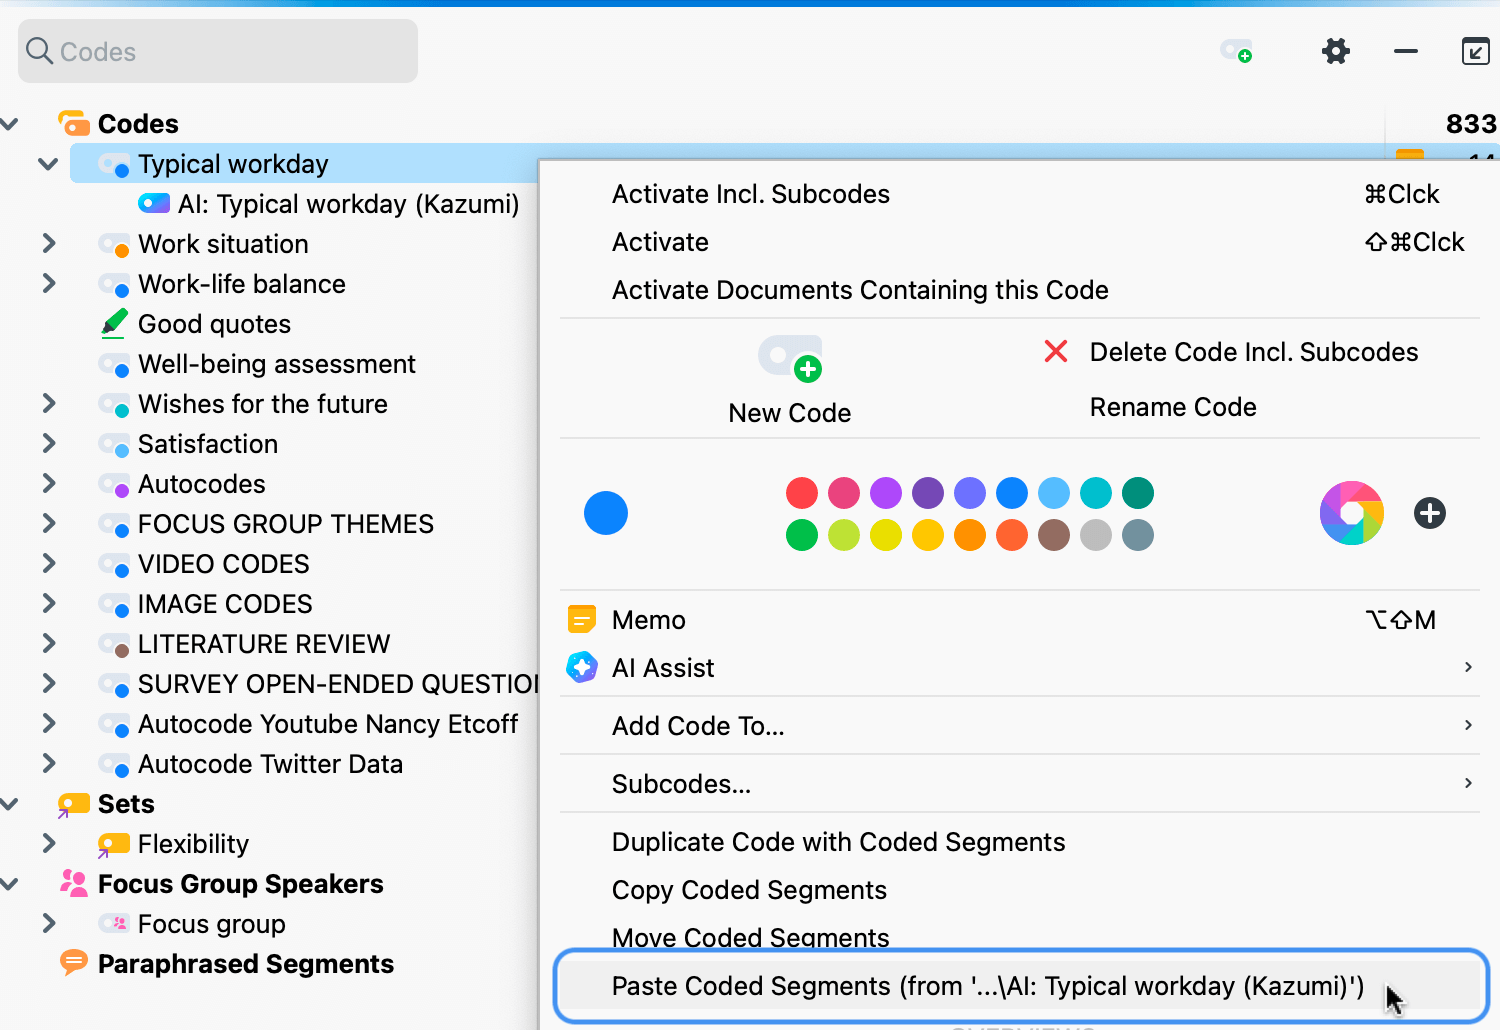
To move your reviewed coded segments from the AI-generated subcode to the parentcode, you can move them following the steps below:
- Right-click on the AI-generated code
- Select Move Coded Segments from the context menu
- Right-click on the target code
- Select Paste Coded Segments (from 'Origin code's name')
- If you no longer need the AI-generated code is empty, you may delete it.

Segment-by-segment
To reassign a segment to a different code, for example, while reviewing each segment:
- You can additionally assign the top-level code to a segment, drag its coding strip from the "Document Browser" onto the desired parent code in the "Codes System" window. This works like copying and pasting a coded segment onto another code.
- As soon as you have assigned all relevant coded segments to your parent code, you can safely delete the AI-generated subcode.

How to edit your "Code System"
Modify AI-generated subcodes
- Rename the code: If you prefer not to move the coded segments into the parent code, you have the option to rename the AI-generated subcode. This is useful when you are satisfied with the AI's coding but want to preserve the coding hierarchy or finalize the code without the "AI" label.
- Change the code’s color: You may also choose to change the code’s color. The unique color applied to AI-generated subcodes is specific to AI Assist, but you can adjust it to match your existing color scheme. However, remember that changing the color is permanent and cannot be undone.
Further considerations and usage guidelines
When working with AI Assist, keep in mind:
- When you call AI Coding again for the same document with the same code name and code memo, it may make slightly different segment suggestions.
- If you analyze texts with critical content (violence, hate speech, bullying, etc.), AI Assist may refuse to code the document.
- The time it takes to receive a response may vary depending on the number of requests in the queue.
- Documents with fewer than 500 characters or more than 120,000 characters will trigger a warning message, as they are either too short or too long for analysis.
Share your feedback
It is important to note that AI Coding is currently in beta. For this reason, we are happy to receive your feedback. You can easily share your thoughts by clicking on the button below:
