Now that you have used MAXQDA's built-in automatic transcription service, the next step is to edit and finalize the AI-generated transcript. This section will guide you through the two main editing approaches to ensure your transcript's accuracy and clarity, preparing it for your research or analysis.
When to edit aI-generated transcripts
You may need to edit ai-generated transcripts for the following reasons:
- Replace speaker abbreviations with names, pseudonyms, or IDs.
- Correct misidentified speaker changes and words.
- Handle instances of simultaneous speaking.
- Add nonverbal cues, such as gestures and emotions.
- Change the structe or formatting style.
- Editing without listening: In this approach, you edit the transcript without simultaneously listening to the audio.
- Editing while listening: Alternatively, you can edit the transcript while listening to the original recording.
Editing without listening
To edit a transcript without watching or listening to your recording, activate Edit Mode in the "Document Browser." You can switch between Edit and View modes in the "Document Browser" using the toggle in the toolbar:

- View Mode:
 Toggle off.
 - Edit Mode: Toggle on.
When you are in Edit mode, you can easily start editing and formatting your AI-generated transcript to meet your specific needs. This mode allows you to edit text documents within the "Document Browser."
To learn more about editing text documents, check out this section of the manual.
As you edit, MAXQDA automatically saves your changes every five minutes to ensure that your work is not lost. However, if you prefer a different save interval, you can customize this setting in MAXQDA's ![]() general preferences.
general preferences.
Find and replace speaker labels
If you would like to replace the automatically generated speaker identifiers, you can do so using our Find & Replace feature.
To do so:
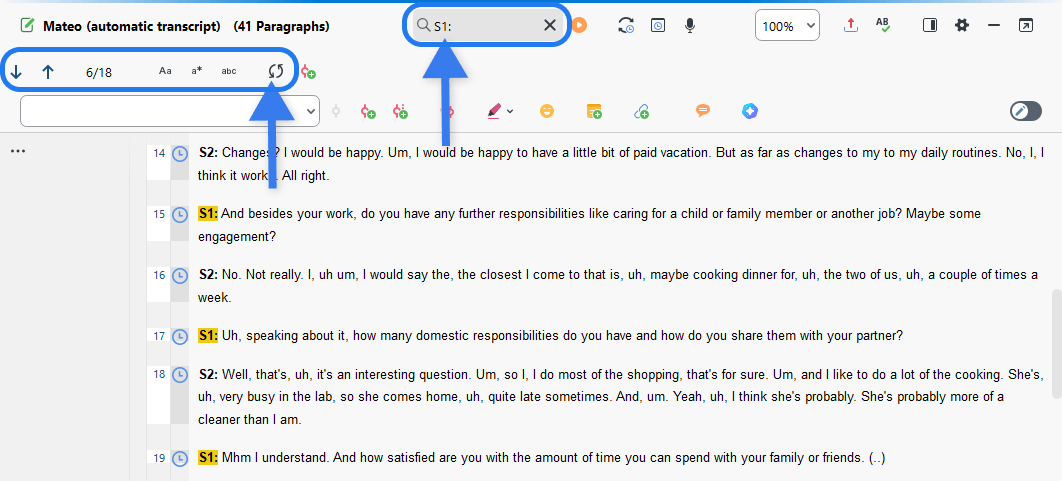
- Enter the identifier you would like to replace along with the colon (e.g., "S1:") in the search bar above the transcript.
- Then, hit Enter. MAXQDA will highlight all search hits.
- Click the Find & Replace button.
- Enter your preferred speaker label, along with a colon (e.g., "Mateo:"), in the new field.
- Finally, click Replace All.

To ensure that only the exact speaker identifiers are replaced and no other words in the transcript are affected, make sure to include the colon (:) in your search term. The colon helps to clearly distinguish the speaker identifier from other similar text, reducing the risk of accidental replacements.
Exit Edit Mode after completing your edits. MAXQDA automatically saves all changes upon exit.
Editing while listening
To edit a transcript, Transcription Mode is the best option. You coul also watch or listen to your recording by clicking on timestamps, but Transcription Mode provides the most efficient tools for editing.
Activate Transcription Mode
- Right-click on the AI-generated transcript in the "Document System" pane.
- Then, choose Transcribe Audio File > Transcribe Manually or Transcribe Video File > Transcribe Manually from the context menu, as shown above.

Transcription Mode: An overview
When you activate Transcription Mode in MAXQDA, your recording will open in the "Multimedia Browser." This browser includes a media player that displays a waveform of the recording for easy navigation.
The AI-generated transcript appears in the "Document Browser" located underneath the "Multimedia Browser," where you can edit it as needed.
You will find the "Transcription Settings" window on the left side, where you can customize various parameters. You can close this window anytime and reopen it by clicking the ![]() transcription settings icon in the "Multimedia Browser."
transcription settings icon in the "Multimedia Browser."

Familiarize yourself with the basic transcription controls
- Play and pause
Use the F4 or F5 keys or double-click Ctrl (Windows) or Shift ⇧ (macOS). Alternatively, you can use the playback controls within the "Multimedia Browser." Hit to play and to pause. - Rewind and fast forward
Click the arrow keys on your keyboard for small increments. Pressing these keys will allow you to rewind or fast forward by larger increments. Alternatively, you can use the playback controls within the "Multimedia Browser." For five-second increments click to rewind and to fast forward. For larger jumps, use the timeline slider. - Volume and playing speed:
Use the control panel, shown below, to increase the volume and playback speed. - Rewind interval
Define the rewind interval, which determines how much the recording rewinds when you resume playback. This feature allows you to continue editing your transcript seamlessly. You can adjust the default interval of two seconds to any value between zero and ten seconds by using the slider in the "Transcription Settings."

Edit the Transcript
After activating Transcription Mode and becoming familiar with the environment, you can begin editing the AI-generated transcript.
To exit Transcription Mode, close the "Multimedia Browser." Your progress will be saved automatically. You can start and stop Transcription Mode at any time—just close the "Multimedia Browser."
Do you want to make minor changes to your transcript?
Instead of using the more complex Transcription Mode, you can use MAXQDA's Sync mode. This allows you to play your recording alongside the transcript without entering Transcription Mode. Simply switch to Sync mode, start playing the recording, and use Edit mode to make swift and precise changes. Learn more about Sync mode here.
Advanced transcription features
The following features can further streamline your workflow.
- Timestamps
Timestamps, represented by clock icons, serve as linking points between the recordings and transcripts. Timestamps appear in a separate column in the "Document Browser," as shown below. When you click on a timestamp, the associated media file starts playing from the exact point indicated by the timestamp. While MAXQDA Transcription includes timestamps by default in the generated transcript, you can edit existing ones or add your own. In the Transcription Settings, you can select Timestamp on enter to automatically include a timestamp at the beginning of each new paragraph. For efficient management, the "Overview of Timestamps" feature provides a list of all timestamps in the current transcript. You can read more about timestamps in this chapter.
- Autotext
In the Transcription Settings, define abbreviations that are automatically replaced with text when you type them followed by two spaces (e.g., "Q:" for Questioner, "R:" for Respondent). You can use up to 15 abbreviations in a single project. - Automatic speaker change
When transcribing a recording with two speakers, you can enable the automatic speaker change feature in "Transcription Settings." This ensures each new paragraph begins with a customizable name, pseudonym, or abbreviation for each speaker. To activate this feature, check the Automatic Speaker Change box in the Transcription Settings. Then, enter the names for each speaker, adding a space at the end of each name. Choose the Bold option if you want the names bolded.

Tips for efficient editing in MAXQDA
To ensure the highest quality of your transcript, follow these best practices:
- Start by quickly skimming through the transcript to get a sense of its overall structure and content.
- Ensure that each speaker is correctly identified and labeled.
- Add or correct punctuation as needed.
- When editing while listening to the original recording:
- Use headphones for better audio clarity.
- Pause and rewind often to ensure you capture every detail accurately.